First, I stress pick a quality kit! 40 amp Relay's This kit has two for a 4 light system.
USE A RELAY! !! !! I will run two wires for my 4 light system. My 4 Guage wire to power my lights
comes from the Battery across the firewall and by the steering staff, it goes through firewall to the
inside and to a Gigantic Breaker that is shared with the Air Compressor I have. My Lights will
be powered here with two 40 amp relay's And two smaller wires that will go to the switches.
Start by removing the clips that hide the screws on the Handle on the winsheild post.
Remove the handle. (phillips) Now just pull post down enough to feed your wire as shown.
I used a CB ant poked it down and taped my wire to it and drew it back up.

This is the strong end of the visor, Just remove this clip, expose the screw and remove,
This also does a little clipping action so don't yank it, it kinda slides rear, and then pulls down.
LOOK AT IT Don't man handle the thing and break it!


This is the Visor clip, notice how it twists into the headliner? 1/4 turn and pull down.

This is how it looks with old CB ant feeding out the bottom.

This is the path your wire should take. Get it BEHIND (To Rear) of this blue tape.
That is where there is a clar path, no sharp metal. Also, in the hole where your light goes
you NEED to be to the LEFT of the sharp metal in that hole, Poke rearward from where the
Visor clip goes Back and THEN to the rear of the Hole! DON"T poke through that sharp metal!

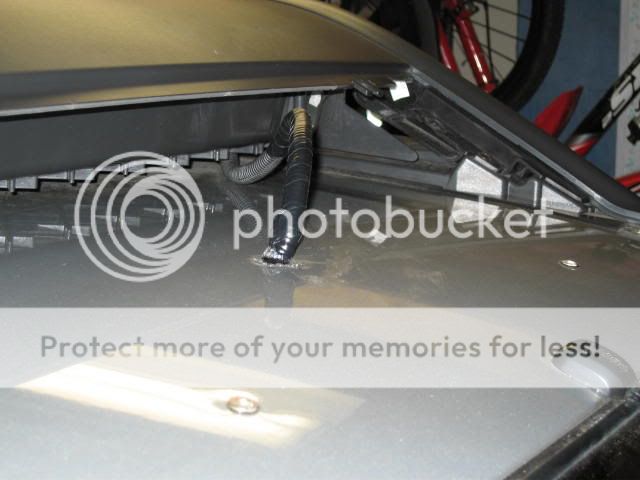
This is an Image after I.... Chickens not permitted!!!! DRILLED A HOLE RIGHT THROUGH THE ROOF!
All Ya do is Get your fingernails under the front side of the interior light here, Pull down! Light clips right
out! Drill up towards rear, Put some RTV silicone on the hole, Put in your gromet. Pass your wires through.
Now put silicone between the wires, around them and a good gob on the gromet. Trust me This most likely
will not leak even without any silicone.... But I am not going to chance it! Use a wire protector so your wire
does not ground out or friction ground out. Run it to your lights.
Now, this is important. Ya see this screw? It holds the front of the air Dam down, It needs a DAB of Blue
threadlocker AND a good all the way around dap of that Silicone, Only then should you run it in.
You may have noticed a small ring of dried silicone when you removed the air Damm, this replaces that and seals
the screw from water intrusion. Don't skip this step and water mark your headliner. Now, put it all back and
tell your wife/boss or whatever you need SHROCKWORKS Bumpers and Sliders to go with this install!

Install your lights where you want.


