I have 25K on this install no problems. I do wish I ran 2 extra wires for my other roof lights that kick out to the side.
See Edit below 5 31 06
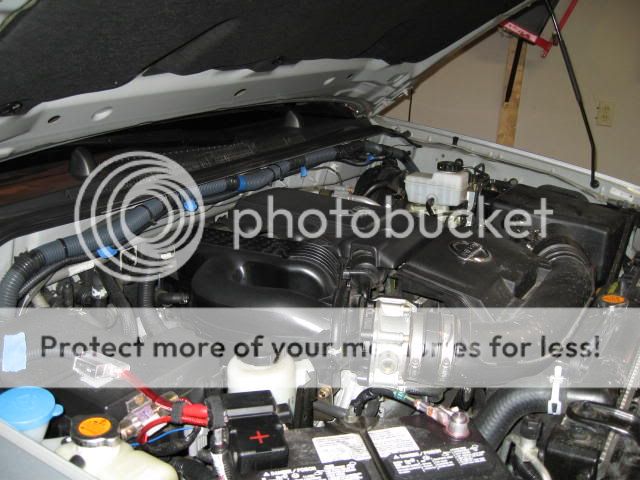
This is just a pic to show you how I got power to the kick panel. Mind you, I have a 1540 watt Stereo system with two amps and an Air Compressor mounted under the seat, you won't need THIS much power. If all you are going to do is Lights. I'd go 8 AWG wire. Fused at the battery... protect the wire with wire loom. You can see here the path the wire takes is marked with the blue mask tape.
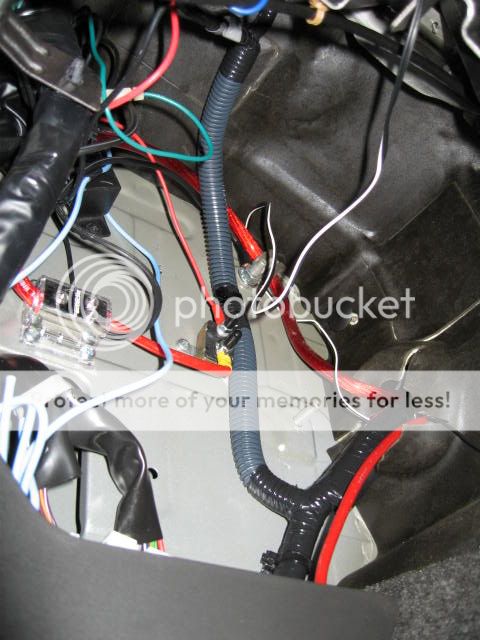
This pic. shows you how it comes in. By no means is this install finalized. I run all my wires and when everything is done I go back and clean it up.
When it is done it will look much like factory wire, secured and POS wires in Wire loom to prevent abrasion shorts. This is the non cleaned up version. Notice wire comes through firewall, Goes into a distribution block, out of that and onto a breaker and on to loads. At top right of this kick panel you see a threaded stud sticking out? Look close and you can see Black wire next to red going to that stud... You can use that stud as a Ground, Just find a nut for it and Use a star washer AKA a grounding washer. You can also see here I have mounted my relay's here. USE SHORT SCREWS or you will blow out into your fender. I used 1/2 in. It's two walls thick here. The wire from the kick panel to your lights should come with your lights, along with the proper relay.
First, I stress pick a quality kit! 40 amp Relay's This kit has two for a 4 light system. USE A RELAY! !! !! I suggest the power that supplies your switch uses ING. Power. This way your lights always turn off when ING. is off. You can Tap one of the Cig. Lighters Pos. that DOES NOT have power when the Ing. is off. (top one on dash or the one in console.)
FYI Relay Post # 86 Goes to the switch
#85 Goes to the ground (Chassis Ground)
#30 Goes to the Battery (POS)
#87 Is Power to the Load (lights) Positive.
When switch gets power from ING it is available to turn on lights, When you flip it, Power goes to Post 86, A magnet inside trips And allows Power to flow from the Battery (#30) and Out to Post #87 (your Load, or lights.) You can have a very very very small switch and wire from the switch to the relay. It requires Less than 1 amp to trip that relay. 14 AWG wire will do from switch to relay.
I will run two wires for my 4 light system. My 4 Gauge wire to power my lights comes from the Battery across the firewall and by the steering staff, it goes through firewall to the inside and to a Gigantic Breaker that is shared with the Air Compressor I have. My Lights will be powered here with two 40 amp relay's And two smaller wires that will go to the switches.
Start by removing the clips that hide the screws on the Handle on the windshield post. Remove the handle. (Phillips) Now just pull post down enough to feed your wire as shown. I used a CB ant poked it down and taped my wire to it and drew it back up.
You need to get the wire to the rear of the visor by removing it. This also allows you room to dip the headliner down CAREFULLY! It's Styrofoam and it will crack if you man handle it!
This is the strong end of the visor, Just remove this clip, expose the screw and remove, This also does a little clipping action so don't yank it, it kinda slides rear, and then pulls down. LOOK AT IT Don't man handle the thing and break it!


Above: Notice the hook to this clip? Careful removing it. And installing.
Below: This is the Visor clip, notice how it twists into the headliner? 1/4 turn and pull down.


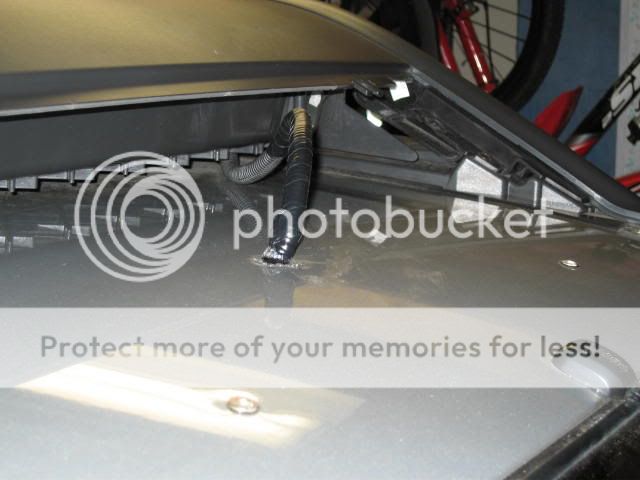
This is how it looks with old CB ant feeding out the bottom. You will just pull the wire to the top, and run it from there BY HAND under the headliner. The path shown. Be best to use small sized wire loom taped every 12 in here. (Not shown)

This is the path your wire should take. Get it BEHIND (To Rear) of this blue tape. That is where there is a clear path, no sharp metal. Also, in the hole where your light goes you NEED to be to the LEFT of the sharp metal in that hole, Poke rearward from where the Visor clip goes Back and THEN to the rear of the Hole! DON"T poke through that sharp metal!
It will wear a hole in your wire and ground out - blow your fuse.

This is an Image after I....
Chickens not permitted!!!! DRILLED A HOLE RIGHT THROUGH THE ROOF!
UPDATE Due to some people having problems with screws stripping, You may want to leave the fwd air dam on, and just put a plate of metal or plywood on top of roof to stop the drill from hitting the air dam. All Ya do is Get your fingernails under the front side of the interior light here, Pull down! Light clips right out! Drill up towards rear, Put some RTV silicone on the hole, Put in your grommet. Pass your wires through.
You can start your ground wire here inside and run it out with the power lines. Ground to that metal in same hole as light came out. The holes are already there, use a screw and a grounding star washer. This way weather don't corrode the inside ground.
Now put silicone between the wires, around them and a good gob on the grommet. Trust me This most likely will not leak even without any silicone.... But I am not going to chance it! Use a wire protector so your wire does not ground out or friction ground out. Run it to your lights.
Now, this is important. Ya see this screw? It holds the front of the air Dam down, It needs a DAB of Blue
thread-locker AND a good all the way around dab of that Silicone, Only then should you run it in.
You may have noticed a small ring of dried silicone when you removed the air Dam, this replaces that and seals
the screw from water intrusion. Don't skip this step and water mark your headliner. Now, put it all back and
tell your wife/boss or whatever you need SHROCKWORKS Bumpers and Sliders to go with this install!

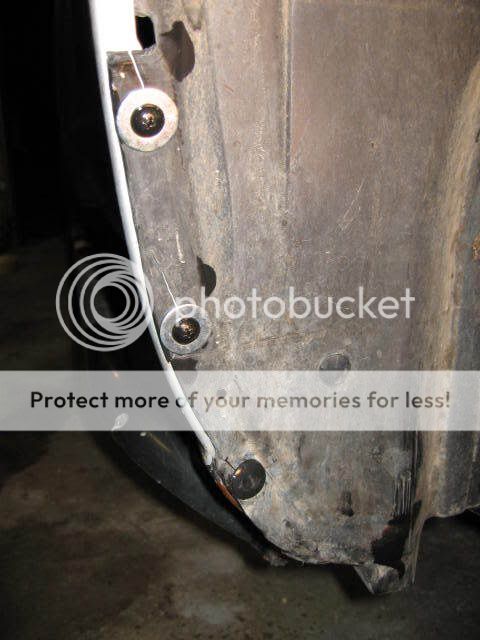
Install your lights where you want. If you have rear lights, I suppose you can also go this way along the roof rack tube or through it if you are into that kind of work. Remember, These two wires are for a 4 light system I do not show a Ground here. You can ground to the Air Dam Bolts or another roof rack bolt that goes directly into the roof. OR you can run a separate ground wire along with these wires and Ground it to the kick panel bolt on drivers side. To here it takes about an hour.
I mount my lights like this because with Locking handle, they can't easily steal them. Any effort to will set off alarm. Wires are totally hidden. Can easily be removed in seconds with on board tool to clear parking garage.
This is how I mounted the lights , I used two C channel aluminum with a wood core, It is mounted just in front of the screws that hold down the bin. Notice how I cut the channel at the ends and flattened it for support. With the lid closed it is very solid. The Grommets used are a lot thicker than provided found at a local truckstop.

And this is what they look like mounted to the Door of the Bin. It turned out Killer! I used a 2 pin quick disconnect for each set of lights. Unplug, unscrew and it's off and in the back! Notice I BARELY can make it in and out of my garage!

How to get em turned on. Although these KC switches are rated for 30 Amps I STILL use a relay! RELAY RELAY RELAY!


Ya'all come back now, we'll leave the lights on Four ya!

SEEN ONLY AT THENEWX.ORG!
It's my Web space for pics, so keep it here please!
05 Pioneer!
MC
EDIT 5 31 06. Many people PM me on how to do this popular mod, but they can't find it. You have arrived.
I have some thoughts to add.
1. Some people have come up with wire through the foot of the roof rack. I need someone to send me pics of that so I can add it with your credit. I choose the way I did it for ease, and serviceability.
2. One person has had a grounding problem at the point I suggest, I suggest that point because in 12V electrical it is always good to get your ground as close to the item you are running. Directions with your lights should also suggest this. I did it this way to get the ground connection point out of the weather. Since one person had a problem, I might suggest bringing an extra wire from ground point on kick panel and up to point I suggest and Joining the two grounds there. It could cause a ground Loop, but since it is a body ground I seriously doubt it.
3. Also, removal of Air dam is not needed, but suggested to keep from drilling a hole into it. SOME people, (More than one) Have experienced the female threaded part in the roof to spin freely, not allowing the removal or re-installation of the Air Dam. I had no problem, several times. It's a factory defect if it happens, Have dealer fix it. But it sucks if it does happen. Be careful when removing these screws anytime, I always turn in in a tad 1st, then back em out. This breaks things loose.
I also used a 3/8 in Drive Torx, not a screwdriver type.
I only do How to's so you can get an Idea what is involved, You have to decide if you are up to the task, have proper tools and the "know ho" to do things needed to accomplish the install. There is no way I can Cover every aspect of installation. But, a Novice can do this with proper time, parts, and tools. MC