Here is how it looks on a 4X8 trailer. Shrockworks bumper, MM PE8000 Winch and a Remote for said Winch.

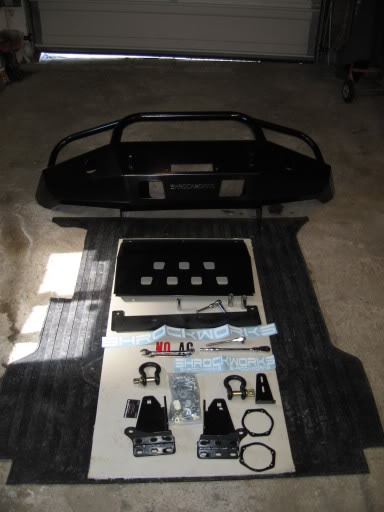
Not what you may get but what I ordered. Bumper, Skid, (2 parts) Shackles I ordered extra, and Decals I order extra (2) Bracket next to shackle is to mount Winch. In my case it was useless and I highly suggest a Winch with internal solenoid I had a few hours trouble with my external because the clearance is not too good. And I done some extra cutting.
On to getting the old trash off.
EDIT 02-07 Dpatton posted detailed Factory bumper removal instructions that are absolutely great here: http://thenewx.org/phpbb2/viewtopic.php?p=40356These are the only hidden fasteners. This is a shot laying under looking up at front corners. 3 each side.

Onto the grille, You pop up the center of the fasteners on top, get it loose and then the bottom has some clips that clip into the top of bumper. but they are a lot harder to get at. It was the last thing I did. This is a good tip and may even pay for half your bumper. DON'T hack up your bumper! Like directions say. Take the time to copy the top of it using a stretch of 1X1 X 3'L aluminum angle as seen here. Use it NOT your Bumper, sell that to someone who respects their X. Notice slots for bottom of grille clips.

This is what it looks like looking up after you have secured top of grille, clipped bottom into Aluminum angle, lined it up with headlamps as guide and drilled holes into angle from bottom up and secured with same fastener that was there to begin with. (See round thing with center that pops up just as on top) Do all 4 this way.

If you have fog lamps Now is the time. On the right you see a factory foglamp. SHROCKWORKS provides the ring on the bottom left and the bolts to secure. You need to remove 4 screws and dump that thingamagig at the top #20 Torx needed. You then put the ring to the bumper surface aligning with the holes THEN install fog lamp with the adjustment knob to the bottom of bumper, glass to front, then put bolts in with nuts to the rear, snug up nuts , use Blue threadlocker. I reccomend removing laps with a twisty, DON't Touch the glass but set aside so if you whack em, your lamps don't break. You can easily install lamps after bumper is mounted. DON'T touch the glass!
If you do, clean it with alcohol to remove oil from skin.

Now you loosen front stabilizer bar and put this bracket under it and secure. Real Easy.

Gee I was so busy I forgot to take a picture of how I got bumper on. I used a 2 in ratchet strap, tossed it over a rafter and hooked it to the shackles and lifted bumper (With Winch) into position, a floor jack topped off with an ammo box as a spacer tipped it right into place to loosely bolt up.

Next part is easy, just install the skid, you can't mess it up. Now, using jack, line it all up and crank it all down.
Now you will notice you have some extra inner fender well to get rid of, Mark it off, I used a cutting tool to detach it, the heat keeps it smooth and looking factory, plus it is easy!

Now then, in OHIO you must have a front plate, It looked SICK on top of Roller. So, I used old bracket and this run of metal with holes in, fastened it to bracket with stove bolts and as you can see here, when you draw the winch up it sucks license bracket into place to cover winch roller. Nifty eh? Average crook don't even know it is there! Easy to re attach hook for a pull.

This is what you will have left over. A unmolested bumper ready for local body shop sale or e bay, Interior and exterior, Skid, corner brackets, what you chopped off of inner fenders, old recover hook, and the fasteners.

This is the old way to mount your Shackles, sloppy, noisy, it will do.

This is the quiet no rub MC way! I used 3 glad hand grommets two black and one red for color. Same as my o ring trick, you get the idea! Crank it on and it stays where you put it! No Rattles! And makes it impossible to get off without a tool.

And this is what it looks like after install.

Here it is after I installed a section of a plastic notebook to cover the Cable peep hole. Using some blk plastic fasteners. And with some driving lights, I went with these so as not to block air flow to the radiator. I tow alot.


Shot of oil filter access with skid installed.

All Done! All lights installed.
 Added: Save the bumper 1x1 angle instructions.
The bumper is a real good template, I cut like 3 slots in one side of angle so it makes the bends, (Contour) and then when it sat pretty flat on slots I used a scratch Owl to make precise marks, BUT when you cut, you use the center of the with of the 1" ....that will put you slightly ABOVE the marks you made. (Because something gets in the way when marking.) Use a drill on both ends center, then cut out center with a saw, and then I used a dremel tool and file to polish it up so it don't cut anyone servicing it. To install, you snap it into grille 1st, Install top of grille, have someone line it up to headlamps while you drill new holes for the push pin fasteners from underside going up... using existing holes as a guide. Drill one, install one do ends first, then centers. MC
Not done yet at all. I guess I have to get some fog lamps, driving lamps, mount my Air horn, you get the idea! As always, I will update as I go! So if you do this install check back just prior to and see if I added anything! At least you know a LOT more than I did before you begin and know what to expect. Not just a "Look at my bumper!" post.


