Boy am I late doing this!
Ok, SHROCKWORKS Rear Bumper install by MC
The no bull directions. You can handle this one by yourself I am sure. I did. Bu then I have lots of experience working alone.
Ok,
1st, Make sure you have all the parts.
Then, park and block and remove the wires for the license plate light and trailer harness if equipped.
Next, remove all the bolts that hold it in, (As pictured) You will put back and leave loose the one I am pointing to in this picture.
SHROCKWORKS was thinking enough to have it so the bumper will slide onto this bolt so you do not need to hold it up.

You see these two buggers? They are on the frame above the tire, If you have the tire rack remove them before you loose them.
Pictured after removed.
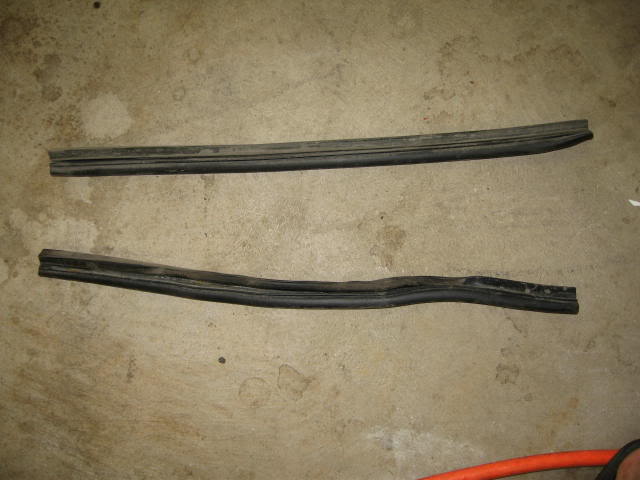
Now, take em, clean em and install them on the edge of the bumper as pictured here, Makes it look clean and adds a sealed look,
plus, when you ditch your X and make it stock again, you'll know where they are.
I am showing one installed in this picture so you can tell where it goes, No need to modify it at all. Just center it.
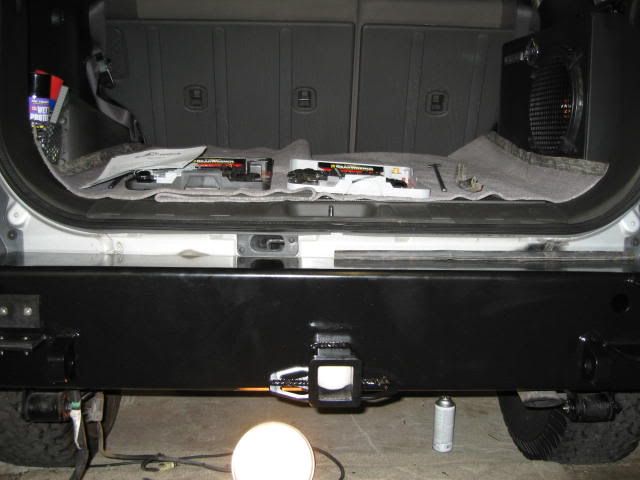
The Bumper installed and in action.

More tips,
Check the bolt that holds the tire rack before you lube it up. Mine required some air tool trimming of the powder coat to let bolt pass through. You want a tight fit so trim easy.
The thing with the chain that lowers and raises the spare tire is easily removed, so take it off! Two bolts.
Don't worry too much about the alignment of the tire carrier latch until you get the weight of the tire on it. Then align it.
(align it how it will be used)
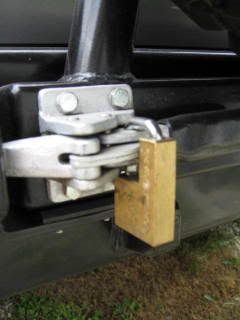
The hole where the pin goes through the hitch is kind of a tight clearance, my Hitch lock did not work. But I found that a Master Lock Swivel Head Receiver Lock pin worked. PN 2866DAT Pictured here:

And no this fancy lettering does not come with the tire rack!

I suggest ordering yours with an Ant mount and a Hi Lift mount. You WILL use them someday.
All this can be seen in picture following this text:
When mounting the hi Lift, use rubber washers of suitable size to keep tension on the wing nuts, and keep from having a metal to metal rub. I used my Glad hand washers, (Used ones) I hear the plumbing dept has similar washers used for toilets. I also took the top Bolt, ground it down with a cut off tool and then drilled a hole into it and found a lock that would fit. This makes it a LOCKING Hi Lift Jack holder for those with sticky fingers. I also bought a Larin Hi Lift Jack, Really a Larin Because it's cheapo and no one really wants it. $38 bucks at Farm store And notice the neat clip that holds Jack handle closer to the jack and AWAY from your rear window. (Check wiper clearance if using a Hi Lift handle keeper.) Location location location.

I love the looks, and the quality/fit of the bumper. TOPS! I gained a massive amount of clearance! My hitch used to dreadfully drag. The Tire rack opens and closes very easily and has a locking latch!
This mod opened up a gigantic hole where the spare was for me to mount an aux air tank! Yippeee! Noticed in this pic, but what I want you to look at is The location of the plug, the two holes to left is where it is supposed to be. I thought it would tug on my Trailer wires on a right turn, so I moved it closer to the center. I also cut some part off the back of the plug to get it to fit in the bracket as pictured. It kept the wire going to the left instead of the right and allowed me to move it even more to center.

To close up,
The gain in clearance required me to buy a 6" drop hitch, and fab up an extension male to female for my light cords to reach. (pictured) And I used the supplied Jack foot pin as a key ring to keep a spare set of keys for everything, I store this under the seat.

Update 8 22 06
And here is my special low buck Shrockworks tire rack tire lock.
Problem was, No 5 lock set available from McGuard. So I keep what I have.
Then I get an idea, I saw a trailer coupler lock at Wal Mart for like $7.

I drill a hole in one of the spare blanks the size of the lock pin. Paint it and put the lock through.
As you can see here, much better than a wheel lock, you can't grab this, and it only will spin, not turn off.
Here is the back side as locked. Once you put the rubber washers on, it's tight, and it's well protected from weather by
the wheel, and there is no way anyone is going to want to fight it with the tire rack locked closed. I think i have got something here!
Can be used for other things I am sure! Now I'm all LOCKED and all SHROCKED!

Same deal shown below, but with matching Mag wheel and 3 McGuard locks and my special lock. Can't even get at it on this wheel.

And how it looks all mounted on the rear!

As always 100% worth it, And great support from Shrockworks.
Now you have all the info to attack your install much more prepared than I was. If Jim changes any of this, PM so I can update directions. This was a 1st run Bumper.
Problems are just incomplete solutions.
MC


