You know what, why and how to order. Read on.
MC was 1st to have it!
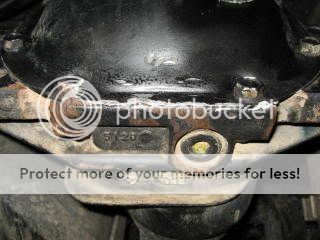
Here is the beating the rear diff cover takes,
I took this picture AFTER I beat the cover back
at the bottom and sealed it from leaking fluid.
The problem is the cover is so thin, rocks just
peal it back and make a leak.
Here is what you want and need.
Not all surfaces are so smooth,

So if you have an X and you leave the road
or maybe your wife just happens to run over
Parking lot islands or curbs the first thing that
takes a hit on an Xterra is the rear Diff cover.
It's the weakest link that will drain your diff in
a hurry should you peal back the cover and not
realize it, that repair will REALLY drain your wallet!
You can go without this cover, but you can be real
sorry too. Ok it arrives like this, Maybe Bare metal,

I opted for some painting, and trim up some
other items while I was at it.

Very simple quick install, Remove the existing
bolts....put new cover over the weak one, install
all the new supplied bolts by hand and finger tighten.
(To insure no cross threading)

Then you tighten them down evenly and snug,
torque to spec if you like. I show this one because
it was hardest one, that brake line may get in the way,
but it is pretty flexible to move a bit.

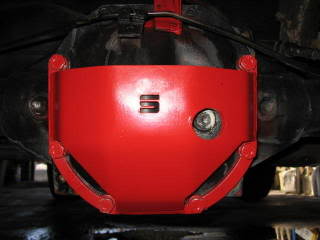
Ta daaaa! No more pealed back diff cover!
And I can recklessly back up now!

This shot shows what makes it work, look at
the
thickness of the flange.

Nothing looks as good as the woman,
And she can run over mall curbs in my X anytime!)
but this Diff Cover by SHROCKWORKS looks pretty
beefy under there! & sweet!

As a final step be sure to check the cover for
leaks the few days after install and always after
a 4 wheeling event. You can still use factory
Drain and fill plugs with this cover installed.
This install was a C200 A D44
Install is much the same but has different bolts.
This is a very reasonable priced product that provides
plenty of protection. It would be the 1st thing I'd buy
for my X if I was leaving the road. MC


